Wednesday 29 January 2014

Shooting Script: Chase Scene Refilm

Shooting Script: Chase Scene (refilm)
Day: Sunday 2nd February 2014

Meeting Location:
Bexleyheath Clock Tower

Filming Time: 5-6pm

Filming Location: Bexleyheath Broadway

People:
Annie - Filming, Special Effects Make-up
Hayley - Filming,
Raman - Filming, Mise en Scene
Jordan - Actor
Emily - Actor

Costumes:
Villain -
Black trousers
Black top


Victim -
Red top
Black skirt
Heels

Props:
Special Effects Make up (Annie)
Torches (Annie)
Maggots- for shelf display

Equipment:
Camera (Hayley)
Tripod (Hayley)

Outline of footage to be filmed:

Victim running through Bexleyheath while being chased by killer

Evaluation of Special FX- Flashbacks

The special effects makeup pieces that I made for the flashbacks that we shot included:
  • The open stomach
  • Bloody wounds and bruises
During the preparation before shooting, when I was applying the open stomach to our victim, Raman recorded the creation process, of which I then edited and turned into a tutorial/overview of how I made this effect. This is shown in the video below: 


As you can see, most of the special effects pieces, only look really good, once the blood has been added to the made wound, however, I feel that this piece went really well.

Below, there are photos, in different angles and lighting, of the special effects makeup pieces that were applied to our victim.


The photos on this row show the blood smeared all over the victims face, a few bruises and cuts on the skin in different places that she was hit.

I am reasonably pleased with this effect, however, I would have preferred the look of sprayed blood on her face, rather than smeared, to make it look more authentic. However, as a viewer, and as the flash back scenes only show for a few seconds, I wouldn't think this would be a large problem.


On this row, the photos show the blood covering the gloves of the killer as he is cutting into the victim, pulling different body materials out from her stomach.


I really like this effect, looking really gory and gruesome, with different bits of the prosthetic coming away from our victims stomach, adding to the effect. This specific effect went much better than expected.


To the left shows the stomach wound in the lighting that we filmed it in, with all the fake blood covering her arm and clothing also applied, adding to the gory aspect to these quick flash back shots.

I was overall, really pleased with this stomach wound application, providing the appropriate effect for what we wanted to portray in these flashback scenes.

 To the right, the flashback, looking at the blood dripping off of the victims hand can be seen, really portraying death, pain and murder, the blood looking fresh and realistic.

I am, again, really happy with the outcome of this, the blood looking the appropriate red colour, rather than becoming a pink, unrealistic colouring, producing this nice, gruesome effect.

Overall, I was very pleased with the special effects makeup in this flashback scene, the effects proving to look even better on camera, than the did in real life. I am pleased that I tried out and experimented with techniques before shooting, however, to be able to create these high quality pieces that are perfect to be able to put in our film opening.

Thursday 23 January 2014

Mise en Scene of Killer's Den

In Hayley's shed, we placed candles on some of the shelves to add a romantic ambience which is ironic because he is going to kill her. cut her open and take her foetus. Also, the candles add additional lighting, but it was not a lot so we used other lighting to aid the filming process. We used a lamp because it had an orange undertone, adding to the ambience of the scene. 
 We placed plastic on the floor because, firstly it would help keep the floor clean from any fake blood, and secondly because our group is trying to emphasize the killer's obsession with death and gore. He is a doctor and likes everything to be neat and orderly. As well, we did this because we were inspired by Dexter's Room from a previous post. When we film the rest of the opening, we are going to put plastic on the garage door and along the walls, as seen in Dexter's room.
Also, we put black bin bags on the windows to block out any natural lighting, but some still came through which was beneficial so we could film and see what we were doing. However, these bags will not be shown in the film opening.
 In the room, the shelves still had all the garden tools and bags on them because we did not put any books or chairs by it as this section will not be shown in the flashbacks. However, when we film the second part of the opening, we will take off these items and put on health and pregnancy books and the foetus jars.
This is where the killer will sit and we are going to put a chair there. We are going to change the stickers on this small cabinet so it says things such as:
  • "nails"
  • "hair"
  • "teeth"
  • "fingers"
However, we will not make the killer open these drawers, it is only suggestive to make the audience squirm and to stress his obsession with human bodies.

Evaluation of Filming Flashbacks - 18/01/2014


On Saturday 18th January, we had planned to go to my grandparents house and use their garage as the location of our villain's hideout. We met at Bexleyheath as arranged around 1, where Annie and Raman had bought some extra things that we needed such as plastic to cover the table, candles and a red top. We already knew we were on quite a tight schedule due to the times that we were all available so we aimed to be done by 4.

We had chosen to change the actor we wanted to play our villain as we felt she looked too young and it didn't fit in with our storyline. As we also chose to completely disregard everything we had filmed over the Christmas holidays, it meant we had more choice with what happened in this scene.

Emily, our victim

For example, we realised it would be more appropriate for our victim to wear a top and a skirt rather than a dress as it would make is easier for the villain to get to her stomach. We kept in mind about how the colour red represents love and passion and decided to have her wear a red vest. Emily's dark hair is naturally wavy and she had already tied half of it into a ponytail so we decided to leave it like that and just mess it up a bit more.

Me doing Emily's hair

I then did her make up, aiming to make her eyes as dark as possible. I first applied eye-liner, eyeshadow and mascara before smudging it to make it look messy. I added blusher to her cheeks and used a combination of red lipstick and pink lip gloss for her lips.

Me doing Emily's make up

Annie then created the stomach wound which our villain would be making to get to the baby. She has evaluated this is her own post. (link)

Annie preparing to create the stomach wound

and again

Blood smears on Emily's arm

Side view of the stomach

Annie also used her special effects make up and fake blood to create a bruise and blood splatters on Emily's face. I felt this look was effective and suited the character well.

Creating a bruise

Adding the fake blood

Not much of the villain is shown so we didn't need our actor to be present so Annie put on the purple surgical gloves for some of the angles we used where the villains hands were in shot.

Annie wearing the villain's gloves

For the lighting in the garage, we decided to use my grandmother's lamp as it cast an orange light which was better than the bright white light from the torches, although we used them occasionally to create an even brighter light.

Raman holding the lamp

Raman holding the torches


We also used black bin-liners to eliminate the natural light coming from the window as it created a more gloomier atmosphere.

Raman and Hayley sorting out lighting

Blacked out windows

We also lit numerous candles and put them on the shelves in the corner, the next time we film with added mise en scene we are hoping to put more of them around the garage as they looked interesting and added another light source as it made it more creepier.

Raman lighting candles
Candles 

I felt the mise en scene that we added to the garage was appropriate as the shots we were taking on that particular day would not show that much of the room. We just added a plastic covering to the table and floor as we felt our villain would want to be clean with his murders and would use it to protect the blood splattering everywhere.


Plastic covering the floor and table

The main problem was the timing, as we only really had a few hours to get everything set up and filmed and we knew it would be tough but I thought we did quite well considering the amount of make up we had to put on our actor and the mise en scene in the room that was needed.
Another major problem was that the camera ran out of battery half way through filming, but luckily we overcame this by realising we were able to film while the camera was plugged in charging, although it made it slightly more difficult. Often the camera would take a while to focus, due to the lighting and this ended up wasting more time than we would have wanted.

However, I do feel this filming session was a lot more successful than the first and hopefully the footage we have will be okay to use for the real film opening. 


Saturday 18 January 2014

Flashback Storyboard

The transitions for all the flashbacks will be fade in then fade out because fading is used to stereotypically portray flashbacks and memories in films.

  • There will be a flashback of a close up of the victim's necklace which she will be wearing. The close up will show a bit of her neck and chest to indicate that it is a cross necklace, not just a random cross. This cross is ironic - she is a prostititute, unmarried and in the early stages of pregnancy.
  • Extreme close ups of the words Struggling and Pain which the killer will highlight. This will emphasize his obsession with pain, gore and death. Also, it will serve as a 'checklist' and a piece of inspiration - he wants his victims to struggle and feel pain, he admires that.
  • An establishing shot of the killer standing at the 'head' of the table, the audience cannot see his face or elements of clothing, he is a silhouette. However, the audience will be able to see the victim clearly, so the killer seems more mysterious and eerie.
  • A close up of the victim's bruised and bloody face and a short bit of her necklace made visible. This highlights the killer's powerful and sadisitic nature. It will show the audience what he does to his victims - he beats them to weaken them (or make them unconscious) , then kills them & takes their foetus.
  • An establishing shot of the foetus jars on the shelves in the killer's den, again emphasizing his fascination with women and foetuses.
  • Another close up of the victim's face however her eyes are open. (When filming we decided on another flashback of him closing her eyes)
  • Killer's POV as he operates on the victim, this involves the audience because it makes them feel sorry for the victim, and makes them feel helpless because they can not help her.
  • An extreme close up of her gory hand hanging over the edge of the table as blood drips off it.
  • A close up of the side of the victim's open stomach to stress the killer love for blood and to fit in with the slasher conventions of showing gruesome images to the audience.
  • Killer's POV as he walks up to the bruised victim. This will indicate to the audience that he is about to operate which will build suspense and tension as they feel powerless because they have to sit and watch this happen.
  • Killer's POV of him holding the foetus immediately after he has taken it out of her. This will show the audience what the foetus looks like and to portray how he has finally got what he sought after. Also, I've positioned his hands in a way similar to how a priest holds a Bible, as if blood and humans (parts) are what he worships and thrives off.

Friday 17 January 2014

Shooting Script: Flashback Clips

Shooting Script: Flashback clips

Day: Saturday 18th January 2014

Meeting Location and Time: Bexleyheath Clocktower at 12.30

Filming Time: 1.30 - 3.00pm

Filming Location: Hayley's grandma's house

People:
Annie - Filming, Special Effects
Hayley - Filming, Hair + Makeup
Raman - Filming, Mise En Scene
Emily - Actor

Costumes:
Victim -
Black skirt (Emily)
Red Top
Necklace (Annie)

Props:
Candles (Hayley)
Table (Annie)
Make-up (Hayley)
Fake Stomach (Annie)
Special FX make up (Annie)
Plastic (Annie or Raman)
Diary (Annie)

Equipment:
Camera (Hayley)
Tripod (Hayley)
Second camera (Raman)
Torches (Annie)
Black Card (Annie)

Outline of footage to be filmed:

Different shots of victim's death, planning to be used to represent flashbacks from the villains point of view.

Storyboard for the Chase Scene


1. The first shot is an establishing shot where the victim is running down a path and the camera is behind her. At this point, the audience are oblivious to what/who she is running away from and that she is pregnant and the killer had beaten her before she got away.

2 + 3 + 4 + 5 + 6 are POV shots from the victim running down the path. This makes the audience feel more involved as they get a sense of her urgency. Then the victim turns around to see how far behind the killer is, and this is the first time the audience are introduced to the idea that someone is after her. However, as this is a film opening, they will not discover why he wants her.

7 + 8. are high angle panning shots where the audience can see the victim desperately running away from the killer then pausing by a tree to catch her breath. This high angle makes her look inferior, smaller than she is compared to the killer.

9. is a close up of her arm as she is leaning against the tree. The audience see a branch cut her and she starts bleeding.

10 + 11 + 12. A mid shot of the victim and the audience see her observe the cut on her arm and squirm at the sight of it. Then, she turns around and her face changes to signal that the killer is getting closer, so she continues running.


13. is a framed as a midshot but it shows his hips and legs so the audience are able to see that the killer has just approached the branch with the victim's blood on it.

14. is the same midshot however the killer bends down to observe the branch. The audience see the killer study the blood with a sadistic grin on his face.

15. is a close up of the killer's face as he smells the blood. This emphasizes to the audience that he is a blood-thirsty killer who enjoys goriness, pain and death.

16 + 17. are wide establishing shots, framed as full body shots, so the audience see the killer rise and begin to sprint, the scent of blood spurring him on, making him more determined to get her to kill her.

18. is framed as the same establishing shot as before, but panning is included which follows the killer running, but then slows down to exaggerate his speed now that he is motivated by her blood.


19. is another establishing shot framed as a full body shot, and is at a high angle, making the victim seem inferior and weaker than the agile and fast killer. Through this shot the audience see her slowing down, she is now tiring and needs to stop. She stops running forward and moves to the side.

20 + 21. A midshot in which the audience see her move behind a thick tree in order to hide away from the killer. They see her panting, then tilting is used to follow her as she falls down to the ground, tired and frightened, and she puts her head in her hands and weeps.

22 + 23. A close up showing her upset, melancholic expression, and she takes her Cross necklace and looks up and says "Please God, save us". (We chose to include a Cross as it is ironic because she is a prostitute who is pregnant and unmarried.) The camera then tilts down to show the audience who 'us' and this is when the audience officially discover she is pregnant.

24. is the killer's POV as he approach the tree the victim is hiding behind. This will make the audience feel helpless as they know he is there, but the victim does not.


25 + 26. A low angle shot of the ground where the victim and killer's feet are visible. The audience see his feet walk up to the tree and pause, holding them at the edge where they are waiting and wanting to see what he does to her. She is crying so hard that she cannot hear him approaching her. In the same shot, the audience see him move around the tree.

27. A high angle close up shot of the victim, making her appear smaller and weaker compared to the killer. The close up reveals her reaction to seeing the killer.

28. A two shot of the victim and killer to empahsize how he has finally caught her. The audience see the killer grab the victim by her neck and drag her up so she is standing face-to-face opposite him. He then strangles her.

29. is a close up, framed as a high angle POV from the killer, displaying her distressed face as she tries to scream for help. The camera zooms onto her mouth.

30 + 31. An extreme close up of the victim's open mouth as she is screaming and the camera continues zooming into her mouth and then fades out into the operation scene.

Thursday 16 January 2014

Deconstruciton of camera angles- not seeing a characters face


Within our re-shoot of the chase scene we have decided that we don't want to see our killers face, whether it be because he is wearing a mask, or because, with the use of camera angles and movement, the shots edited do not allow the audience to see his face.

To be able to do this well, I felt it necessary to do a deconstruction into an advert that I had recently seen on the television that manipulated the use of camera angles, shadows and reflection to conceal the identity of a specific character through the sequence, until the end where you get the first look of his face, an effect that we wish to replicate in our film opening within the chase scene and the diary scene.
The advert that I deconstructed was advertising the new tv-series "Fleming". The initial shot of the sequence is a long, full body shot, a door concealing more than half of the screen, but the main focal point of the image directed to the top right of the screen where Fleming is standing, facing away from the camera. This initial shot gives the feeling of being hidden, as if we as the audience are watching this man, unbeknown to him.


A fast edited extreme close up shot of the man doing up the cuffs on his shirt, is sequentially shown, followed by another long shot of the man facing away from the camera, looking in a mirror- this just adding to the feeling of watching, and spying on this person, that we still don't know the face of.

An extreme close up shot of the side of Flemings face, his reflection shown in the mirror is shown, just missing the view of his full face and an extreme close up shot of just behind his ear run quickly at the end of this scene, building up the desire to see his face, teasing the audience by giving them almost glances.


The use of focus is played upon a lot in this small sequence, used to highlight Fleming in all of the shots that he is in, even if he isn't in the main image. This is to keep the audience focused on him, not allowing their eyes to wander to the things in his surroundings.

Using objects to conceal half of the screen, and distored reflections to give disjointed images of Flemings face, is another thing that is used a lot within the sequence, making the audience focus on Fleming, and giving them small glimpses of his face, building the desire to know what his face looks like even more.


From the scene in the room where Fleming is looking in the mirror, away from the camera, the scene changes, the location being a bar, where Fleming walks across the room, shown in a range of camera angles including a long shot, mid shot and close up shot, all avoiding his face again. This change in scene, still keeping the feeling that we as the audience are "stalking" him, with the blurred out screen invading objects such as a wine glass or a persons body getting in the way, yet again increasing the need to see his face by the audience,


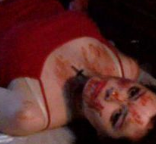
The final shot before we are shown Flemings face is a zooming camera movement towards his back, as he is sitting down. A range of different shots, all with quick pace editing, are shown before, the final camera movement, a 180 degree turn around his head,  is executed, showing his face, finally. Eye contact with the camera in this ending shot with the man who's identity had been a mystery, gives the feeling of being caught, adding tension, and finishing the scene with a final "pow"- exactly what my group and I wanted to do as the final shot of our film opening, seeing our killers deformed bloody face with "ADORE AND ENDURE ME" carved into it.

 This deconstruction, however only looking at the camera angles and editing, seeing how they portray different effects, gives me a much better idea of how to do our chase scene filming, including what camera angles to use, how to get the audience to focus on the character we want them to focus on, and how to make them want to find out what our killer looks like, creating the feeling of mystery and danger.