Showing posts with label Trial. Show all posts

Friday, 15 November 2013

Practical Investigation of Content in Killer's Diary


I was trying to find some pictures of foetuses, especially ones from folklore such as devil or animal foetuses. Unfortunately, I was not able to find much however I came across sketchings from Leonardo Da Vinci of foetuses and pregnancy women.


 Looking at Da Vinci's work, it would be interesting if our killer was to draw pictures of pregnant women and their foetuses because this would emphasize his obsession and fascination with foetuses and pregnancies. The audience will see him as mysterious and obsessive but also memorable.
Here, I have taken pictures of what the killer's diary might look like with the pictures in and words circled in red pen - red = blood, danger, lust, and (ironically for this) love.

 Here, there is a sketch of a dead woman with a small devil on top of her, looking at us smugly. This devil could represent the killer and his love of killing innocent women. The words "no more moaning, no more crying" have been circled which could be interpreted as the woman after being killed.
 Here, one of Da Vinci's foetus sketches have been scrunched up so to represent the killer's carelessness of state; he is only focused on killing, not making things look neat. "Assaulted", "damaged" and "fractured" have been circled which could indirectly tell the audience about what happened and of the victim's injuries.
 The words "That man's a killer", "killing" and "unemotional" are circled which are words very appropriate to the killer; he loves killing, knows he is a killer and is unemotional, and almost seems proud of it.
 Here, there is a painting of a baby cannibal, looking possessed and scary, and this would be like the killer's 'idol'/role model. The killer does not eat the foetuses as in the picture, but he does still kill them (and enjoy it). "Pain", "murderer" and "kill" have been circled and, as mentioned, it tells the audience that he acknowledges what he is and what he does, and deems it acceptable.
 There is a picture of a devil foetus with horns, a spiked tail and spiked wings. The picture being in black and white makes it seem older and more traditional - like folklore. "Sick with fear", "Crazy mad" and "trembling" have been circled, "sick with fear" and "trembling" are circled to describe the victim and "crazy mad" the killer. This gives the audience hints of what both the victim and killer are like when he murders them.
 Here, the words "bent my head and sniffed", "had been shot when sleeping in bed", "killed" and "dead" have been circled. "Killed" "dead" "had been shot when sleeping in bed" describe the victim, but they will not be shot, they will either strangled, hit over the head, or bled to death. I circled those words just to ndicate to the audience of his obsession with death. We thought the killer could have a habit of sniffing his victims, this is a common feature to horror films - Don't Let Him In, the killer drools and in Batman, the Joker licks his lips.
 Here, there is a picture of a radiating pregnant woman and her stomach and foetus are hard to make out. This picture represents how the killer is engrossed by pregnant women and their unborn babies. "Struggle", "violence", "death" and the words above ^ are circled and if we used a close up shot, this is what the diary will look like.
 Da Vinci's sketches have been placed inside the book and "afraid", "evil men", "power", "darkness", "scream" and "limp" have been circled. These are all words used to descibe the killer (evil men, power, darkness) and the victim(scream, afraid, limp). These are horror and slasher conventions and stereotypes of what a killer and victim are like.
 Here, there is a drawing of fairies around a cot and a baby who has a devil face. The fairy picture represents how many care for babies, however, for our project is it the opposite - the killer is killing them before they are even born. The devil baby ties in with the fairy picture - he believes foetuses should be killed because they are devilish.


This is what the book will look like, there will be pictures and sketches coming out to, again, emphasizes his carelessness - he has thrown them into the book as accounts and self-reflections to keep record of.


 Overall, for our final project, we will make the killer's diary look messy with random words circled describing the killer, victims, and the murders. For the opening, these words can be focused on to show the audience of the killer's obsession; obsessive killer's being a slasher convention in order to frighten the audience more. 

Planing the Deaths Scenes AND Evaluation of Death Scene Trial

After the death scene trial, I realised that I, along with my group, have a few extra things that we need to plan and decide before we make the official shots and clips that might go in our film opening.

First of all, we needed to decide how the the victims would be killed. The aspects that we have taken from the idea of the victim being pregnant, I have put into a list, shown below, of how he could kill his victims:
  • while the foetus is being carved out of their torso, leading to them bleeding to death
  • by being strangled
  • by beheading them
  • by strangling them with the umbilical cord
Some of these ideas link to previous research that we have all done. The foetus being taken out of the torso links to the deconstruction of Creep and how the killer carved out the foetus' of the women that he victimised and the beheading idea links to the Shordtch location research where we saw a model head placed on a spike portrayed on top of a wall.

Se7en

Another aspect that we had to decide is when the killer would take these photos of his murders. I decided to look at a film that uses the idea of the killer taking pictures of his victims too, and ended up deconstructing Se7en.
When looking at the Se7en, I saw that the killer took a series of photos of one of his victims that he tied to a bed for just over a year, taking photos after set periods of time to see the victims deterioration through the year. A few screen grabs are shown below:

To the left shows the first photo taken of the man at the beginning of the year looking normal.

To the right shows the photo taken of the man near the end of the year that he was tied up looking as if he is decaying while still alive- a rather grotesque look.

This idea, although a good one, wouldn't really fit with out theme of killing, but taking the idea of the before and after stages of his victims, having a photo of his victims in their day to day lives- "stalker photos"- and a photo of his victims as they have died on his torture table.

Special FX

After taking this into account, I decided that it would be best, for our film opening, if we just got our killer to take photos of his victims after they have been killed, having the idea of the "stalker photos" within the theoretical "rest of the movie" that we will not be making.

When these photographs would be taken is closely linked to where they will be taken. As a group, we decided that the killer would take the photo after his victim is dead- lying on his "torture table".

Taking all of the research and planning that I have completed into account, I decided to do a special effects makeup investigation into the way the victims would be displayed:

First of all, I made an umbilical cord. One that we could use to "strangle" the victims of the killer.

 To make this, I used scrunched up tissue paper, PVA glue, acrylic paint that was watered down and cling film to add the shiny, slim on the cord.

Once I had made this, i then used my neck as a model, and added bruising, with my bruising wheel, to show the special effects makeup that I would use on our victims to symbolise strangulation via the umbilical cord.


I also made a prosthetic stomach out of paper mache, nose and scar wax, the bruise wheel and fake blood.

Step by step, I covered a balloon in paper mache with two layers. This would give enough strength for the stomach to stay rounded.

I then popped the balloon and cut the excess paper mache from the bottom, creating a neat edge.
I turned up the sides of the edges so that it would be easier to apply to the stomach.

After drawing where I would cut the fake stomach so that it looked as if it had been torn open, I made the fake wound, peeling the material back.

 Next, I  added cotton wool to the inside of the peeled back "skin" to show the muscle and tissue that would be there, along with the insides of the stomach. This was to symbolise the organs and tissues within the carved out stomach. I then painted them with red, brown and yellow tones to create a flesh effect.

Adding the fake blood was the last effect. I was originally planning on applying this prosthetic to myself, but I found that it was way too difficult to do it to myself, worrying about all of the dripping blood and getting everything stuck down properly at the angle that I was in.

The finished piece is quite good, and I think that if we use this effect in our film opening, it would be a success.

I then just experimented with cuts and bruises on different parts of my body that we could add to show the struggle before the victim got on the torture table.

To the left shows a graze  using thick "scab" blood and the bruise wheel to add colour and obviously bruising.

This investigation has allowed me to test out my ideas and also get more of a plan together, collating and developing them to get an appropriate representation of the slasher genre within this very important aspect of mise en scene that will play a large part within the film opening.

Monday, 4 November 2013

Death Scene Number One- Trial

For my practical investigation this week, I have decided to do one of the death scenes that will be shown in the film opening as a photo in the diary and/or a small clip- as if a memory.

However, during the half term that I had to do this, I could not find any willing participants to be the model for this scene as it was inconvenient for them to come over at one time, or they were busy doing other things. In the end, I had to do it as a last minuet thing with my sister, who was not very willing, but agreed to help me out. This was quite worrying to me, being that if someone couldn't give up an hour or two of their time, how would we get a few people to do the whole film opening. This is an issue that we will have to address soon.

So on the day before we went back to school, I attempted to create this scene:

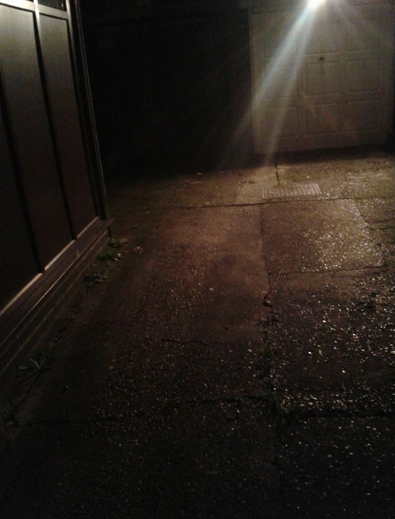
The location of this death scene is an alleyway next to my house, at around 5 pm. The location is shown in the pictures to the left and right, and as shown, I experimented with the lighting before hand to get an idea of what type of lighting would be appropriate.


To the left you can see the motion sensor light from the garage, giving off a visible beam towards the ground in front of the building. This could be where the body is shown.

To the right is the same alleyway, but with the main light not working and a pale light shining towards garage. This low- key lighting gives an eerie effects, adding tension to the image.

To the left is another low-key lighting effect, however, the camera is angled towards the garage, coming from the wall, as if its in the view of someone who is hiding- possibly in the killers point of view.

The final photo to the right shows an even darker lighting, illuminating only a small section, making the image go into darkness- adding to the tension and the fear of the unknown.

After putting the special effects makeup on my model, I positioned her on the floor of the alleyway, as if she had been attacked and murdered- her throat slashed. Below shows the shots of this scene:

 To the left and right shows my model at a close up shot with her throat slit and blood on her shirt, with bruises on her face, and dirt on her all over her- as if she had been in a struggle, restrained and murdered.
The lighting is quite high-key, illuminating the face- the photographs would be more appropriate as police shots of a victim than the killers shots of his work, or a memory- not wanting to be caught, and more subtle when killing the victim.

The photograph to the left has more appropriate mise en scene, being that the victims eyes are closed, the blood is illuminated against the light shirt, and the lighting is more low-key, for the killers memory, or is photograph of his victim.

The final photo above shows my victim from further away, the light from the motion sensor light streaming down on her. It is, however a photo that would not be taken by the killer- or be in his memory of his victim, as the mise en scene isn't quite right.

The finished result of this first death scene for our killers diary turned out to be okay, however, I do feel that we need to do it again, using this as a trial death scene and an example of what obstacles we will have to avoid or overcome. I will be doing another post, planning the death scenes that we are going to create- where they will be located, the way the killer will kill his victim and the type of person that our killer is going to be focusing on.