Now that we are at the point where we have got our actors, we have finalised our storyboard, we've done a large amount of deconstructions into different aspects of our initial idea and we have tried out, revised and developed our practical ideas throughout the entirety of our coursework so far, we now need to tie up loose ends and start planning the days that we are going to film.
But before we do this, a few other aspects of our filming process need to be trialed to see how they will turn out on camera, and whether they are a success, and if not, how we will need to adapt our plan to accommodate this obstacle.
Below, you can see a documented investigation into the different special effects makeup that we have planned to have within our film opening. To ensure that each effect is done correctly- so that it looks realistic on camera-, I have also done a range of options for each effect so that we can choose what would be most appropriate for each scene.
The special effects that we will be using:
- Sfx makeup on the victim- running away from the killer
- the fake pregnant belly before the killer has got his victim
- the fake pregnant belly that has been ripped into by the killer
- bloody masses that will be taken out of our victim- organs, intestines, umbilical cord, foetus etc
- blood splatter on victim as cut into stomach
- the "adore and endure me" scars/cuts on the killers skin
- the killers hands
Victims initial appearance when running away from killer

To the left, right and below, you can see different experimental makeup pieces that I carried out, looking at what aspects to use during filming in our real film opening.
Since our victim is going to be a prostitute, I have thought about the hair and makeup that she would have, but due to being chased by the killer, it has run, been smudged and is messy. This is shown in the photo to the left. I also added some liquid latex along the cheeks to symbolise tear streaks down her face, really creating the look that she
I then did a separate investigation of different bruises, and cuts on the victim that would be present. These are shown below:
Fake stomach
Before:
The victim, in the chase scene in the woods, will have to be shown as being pregnant. To do this, I needed to create a fake pregnant belly that was of a good quality, so that our actor can still run, without it falling apart.
To do this, I used a You Tube video that I found, to help:
After watching this, I found that I needed to get the following, to be able to make:
- plastic straps
- safety pins
- scissors
- plain white t-shirt
- hot glue gun
- a pillow
The steps that I took to make the final fake stomach:
1. I took the pillow, emptying it of just over half of its contents.
2. I then took safety pins, shaping the pillow to look more like a stomach shape.
3. Once I did this, I took a white t-shirt that I got from Primark, covering this initial shape, fixing it onto the pillow with hot glue.
4. Taking just some string that I found in the cupboard, I strapped the fake stomach onto myself, to see if it gave the correct shape for a pregnant stomach.
Below shows the final effect this gave:

Apart from the bad quality photographs, I feel that this application will be perfect for our film opening. It is simple, but effective, and will be exactly what we need for the chase scene.
After:
I then had to create another fake pregnant belly, but this one is the one that will be shown after the killer has murdered his victim. Below shows a step by step record of how I did this:
Bloody masses


During the death scene, the killer will be shown to be taking different "bloody masses" out of his victims open stomach. To do this, I thought we could buy different organs from the supermarket, putting lots of fake blood on them, for the killer to then pull out of his victim, placing them in a bowl.
Blood splatter
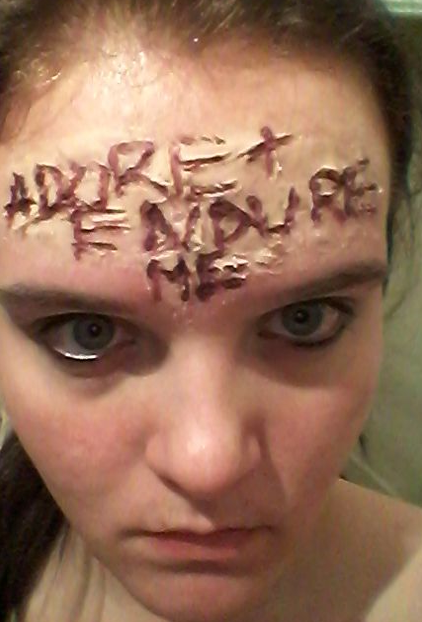
Adore and endure me scars on the killers skin


Another feature to do with our killer is that he will have "Adore & Endure Me" and "A&E" carved into his skin, on various different areas of his face and arms.
For this investigation, I decided only to do one "scar", on my forehead- a difficult place to apply special effects makeup- as I didn't want to use up too much of my supplies.
First I applied two layers of liquid latex as the base, spreading nose and scar wax on top to simulate the skin that is going to be manipulated.


With the side of an object, I "carved" the words "ADORE + ENDURE ME" - I did the longer version as a compromise to only creating one scar- into the nose and scar wax.
Filling in the carved words with red and black coloring's, I added bruising with my bruise wheel, and applied the fake blood.
Three different versions of the "scars" are shown below:
I personally prefer the piece to the top right as it isn't so bloody that it looks really fresh, but it does look recent and quite shocking, which is what we want the audience to react to. Also, the one with the most blood reduces the visibility in the actual words that are carved into the forehead, which is not what we want, and the piece with the least blood shows off the irregularity in the skin smoothness of the forehead, showing the makeup too much for my liking. The piece in the middle is the best, and this is the one that I shall do for our final film opening sequence.
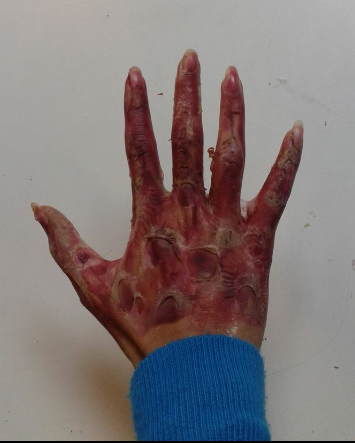
Hands of killer
I have already done a post on the investigation of what the killers hands will look like, but I never fully finalised it.
Knowing, now, that the killer will be an ex-surgeon, and he will have gloves on quite a lot, to perform his murders, I decided to do another investigation, this time, taking this information into account.

For this investigation, I applied liquid latex onto my entire hand, leaving it to dry, and simply dabbing it with a white powder- giving the effect of dry/blistering skin. I wanted to represent the look your hands have after wearing gloves for an enormant amount of time, as if you have been in water for too long, and your hands become soft and wrinkly.
To the left and above, you can see the final result, of which I was very pleased with and intend to use within our film opening.

 The special effects makeup pieces that I made for the flashbacks that we shot included:
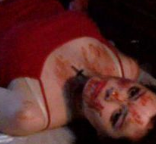


 To the right, the flashback, looking at the blood dripping off of the victims hand can be seen, really portraying death, pain and murder, the blood looking fresh and realistic.