Showing posts with label Opening. Show all posts

Thursday, 6 February 2014

Editing Opening Titles:

For our opening titles, our original idea was to have the titles placed in between the flashback clips so I looked at creating a 'template' title that we could edit with the names.

On Final Cut Pro, I looked at the existing templates for titles and liked "Ink" and "Splash - Ink Splats" as I thought the ink could remind the audience of blood, if I changed the colour and edited it slightly.


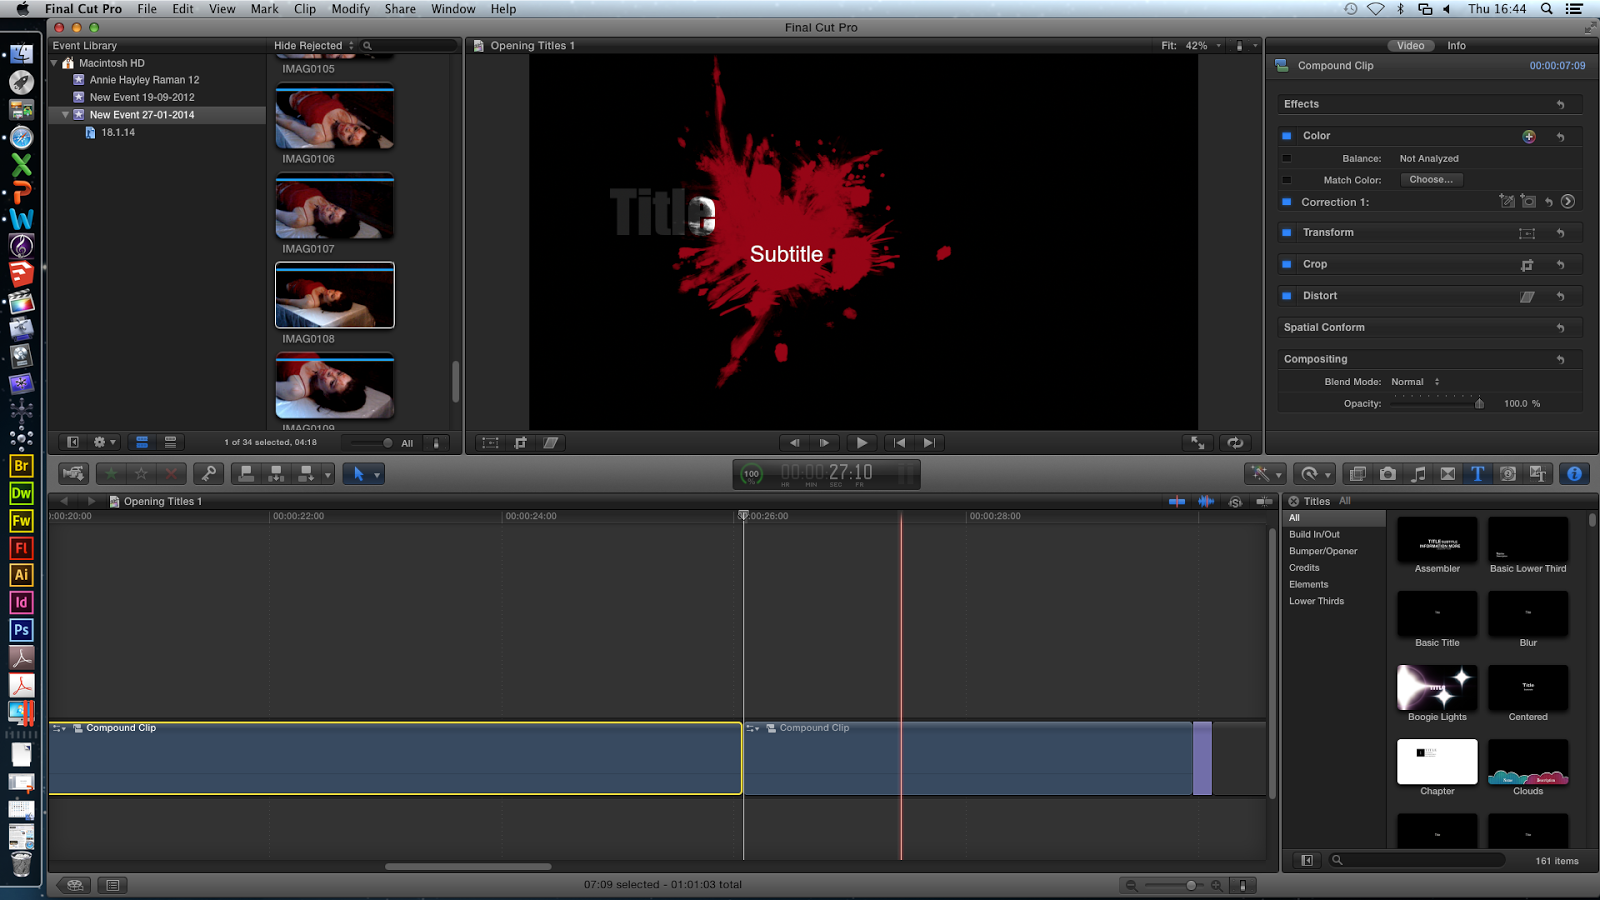
I chose "Splash - Ink Splats" as I prefer how it dripped down before splashing. I changed the colour so it resembled blood and trimmed the clip so it was only a couple of seconds long.


I then disregarded the option of a subtitle as I was only using the actors name but if we decided to use this with all the other names such as 'Director' then we could use the subtitle as well. As the background was black I decided to go with a white font as a contrast, with the  "Bank Gothic" font as I liked the style.


I then switched back to the original white/grey background which meant the font had to be changed to black which I didn't think looked as effective with the letters that were in the ink itself and the font I had chosen.


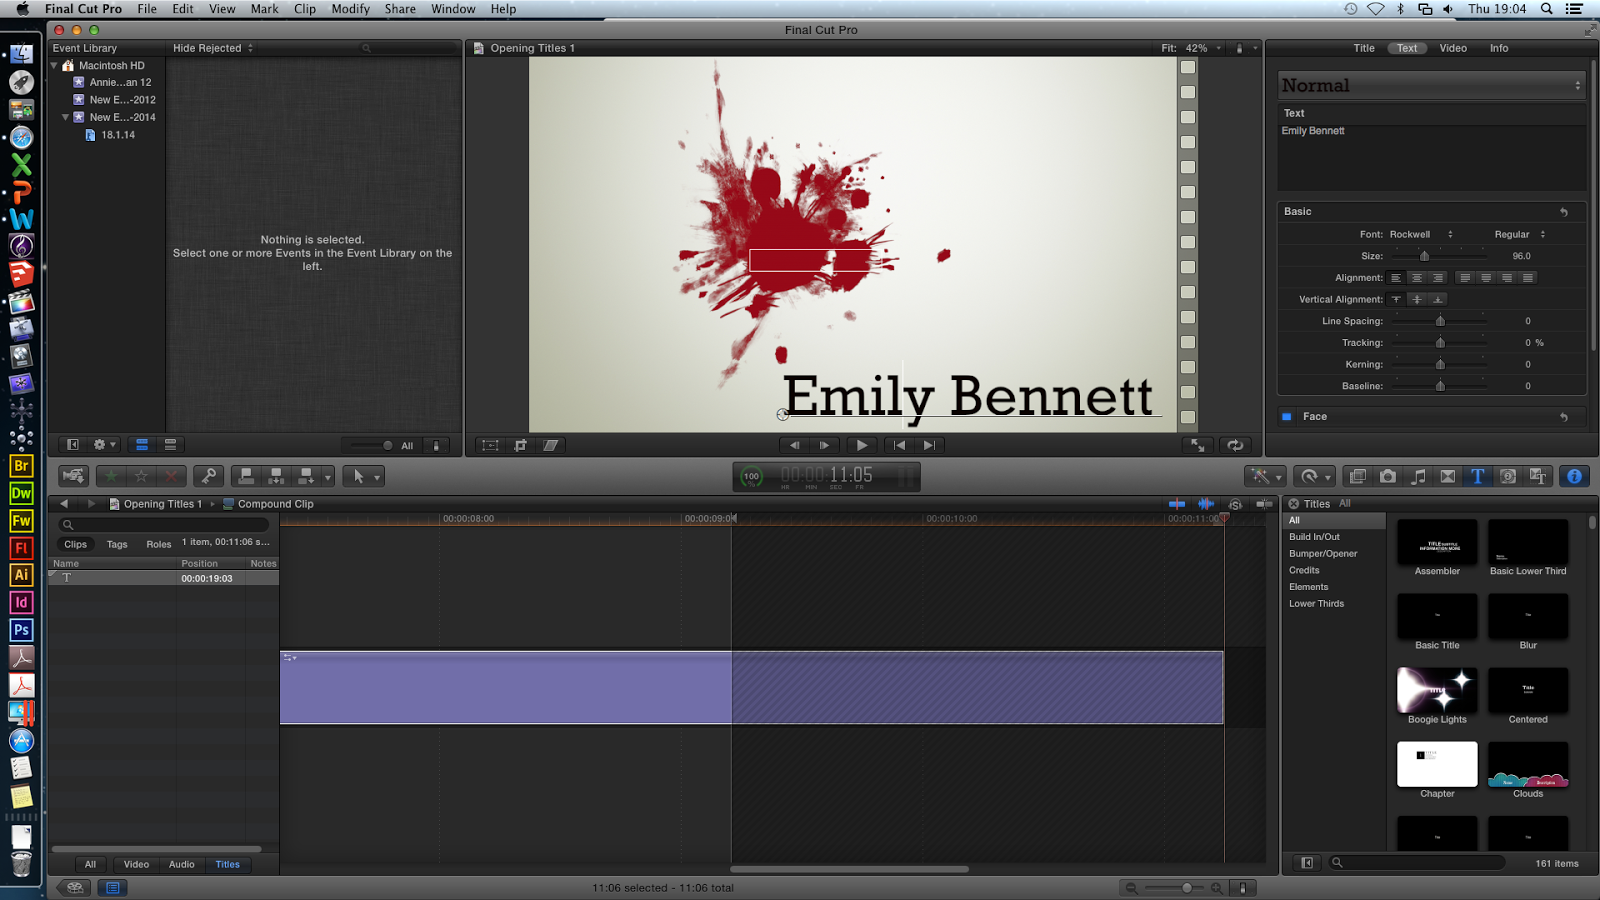
Therefore I had to move the writing to the bottom right of the screen as there was more space and I thought it would look effective. I also changed the font again and chose a few that I thought would look better.


The next font was similar to a type writer and I liked the look of it but I felt it didn't suit our genre and the style of our film opening.

#


I decided to go with the font shown on the right as I liked the fact the capital letter were enlarged more than the rest of the word. I made sure it would look good when the ink ran down before splashing as it only appears at the very end.

I wanted to add a sound to the title, just to stop it from being completely silent and if we wanted them to come up quickly between the different flashback clips then a quick sound would help add to that effect. I looked into a number of different sounds that would have some relation to the horror theme and finally settled on the one below and when I added it to the current clip, I timed it with the blood splashing.


This is the final result of the first draft.


I then decided to edit it further by changing some of the elements I used. I removed the white background as I thought having no background at all (and therefore completely black) would make it more conventional to a horror/slasher film. It also makes the blood stand out more but this meant I had to change the font colour back to white again, but I dimmed it slightly by making it more grey so it doesn't seem as bright.

I also decided to move the position of the writing to the top right corner which meant as the blood drip runs down, the writing moves up, I liked this effect but I wasn't sure if it would fit our genre well. I decided to change the sound as well and chose a 'blood spatter' sound effect that I also found on YouTube, which I found to be more gruesome and gory, similarly to the first one I timed it with the splashing of the blood at the end.


This is the second draft, with the changes mentioned above.


After editing the two versions of the credits and showing them to my friends, I prefer the second one as the sound is more related to a slasher movie and I like the way the name comes up onto the screen. However I feel that it is a bit basic and I'm not sure whether my group were looking for something more sophisticated or not. We are also not sure whether to have the credits onto the actual footage to save us some time as having the credits separately will mean we will lose more time on the storyline itself.

However, if we do decide to choose that option, there are elements of these titles, that I can incorporate into the new credits such as the blood splatter. There is also the option of having the credits when he is writing in his diary as the white background of the first one could resemble paper and I think the blood drips would look effective in that case.

Thursday, 23 January 2014

Evaluation of Filming Flashbacks - 18/01/2014


On Saturday 18th January, we had planned to go to my grandparents house and use their garage as the location of our villain's hideout. We met at Bexleyheath as arranged around 1, where Annie and Raman had bought some extra things that we needed such as plastic to cover the table, candles and a red top. We already knew we were on quite a tight schedule due to the times that we were all available so we aimed to be done by 4.

We had chosen to change the actor we wanted to play our villain as we felt she looked too young and it didn't fit in with our storyline. As we also chose to completely disregard everything we had filmed over the Christmas holidays, it meant we had more choice with what happened in this scene.

Emily, our victim

For example, we realised it would be more appropriate for our victim to wear a top and a skirt rather than a dress as it would make is easier for the villain to get to her stomach. We kept in mind about how the colour red represents love and passion and decided to have her wear a red vest. Emily's dark hair is naturally wavy and she had already tied half of it into a ponytail so we decided to leave it like that and just mess it up a bit more.

Me doing Emily's hair

I then did her make up, aiming to make her eyes as dark as possible. I first applied eye-liner, eyeshadow and mascara before smudging it to make it look messy. I added blusher to her cheeks and used a combination of red lipstick and pink lip gloss for her lips.

Me doing Emily's make up

Annie then created the stomach wound which our villain would be making to get to the baby. She has evaluated this is her own post. (link)

Annie preparing to create the stomach wound

and again

Blood smears on Emily's arm

Side view of the stomach

Annie also used her special effects make up and fake blood to create a bruise and blood splatters on Emily's face. I felt this look was effective and suited the character well.

Creating a bruise

Adding the fake blood

Not much of the villain is shown so we didn't need our actor to be present so Annie put on the purple surgical gloves for some of the angles we used where the villains hands were in shot.

Annie wearing the villain's gloves

For the lighting in the garage, we decided to use my grandmother's lamp as it cast an orange light which was better than the bright white light from the torches, although we used them occasionally to create an even brighter light.

Raman holding the lamp

Raman holding the torches


We also used black bin-liners to eliminate the natural light coming from the window as it created a more gloomier atmosphere.

Raman and Hayley sorting out lighting

Blacked out windows

We also lit numerous candles and put them on the shelves in the corner, the next time we film with added mise en scene we are hoping to put more of them around the garage as they looked interesting and added another light source as it made it more creepier.

Raman lighting candles
Candles 

I felt the mise en scene that we added to the garage was appropriate as the shots we were taking on that particular day would not show that much of the room. We just added a plastic covering to the table and floor as we felt our villain would want to be clean with his murders and would use it to protect the blood splattering everywhere.


Plastic covering the floor and table

The main problem was the timing, as we only really had a few hours to get everything set up and filmed and we knew it would be tough but I thought we did quite well considering the amount of make up we had to put on our actor and the mise en scene in the room that was needed.
Another major problem was that the camera ran out of battery half way through filming, but luckily we overcame this by realising we were able to film while the camera was plugged in charging, although it made it slightly more difficult. Often the camera would take a while to focus, due to the lighting and this ended up wasting more time than we would have wanted.

However, I do feel this filming session was a lot more successful than the first and hopefully the footage we have will be okay to use for the real film opening. 


Friday, 10 January 2014

Evaluation of Filming Chase Scene - 02.01.2014

[ADD PIC] On the day we shot the chase scene, Annie, Hayley and the 2 actors came round my house because the park is up that road. Annie began doing Jordan's make-up first; she applied liquid latex and then baby powder and make-up on his hands to make them look old and as if he had beaten the victim before she ran away. Then she put "Adore + Endure Me" and "A+E" on his face.
 
Next, Annie started work on the victim's face, making it look bruised and bloody, as if the killer had beaten her. The victim also had smudged lipstick and mascara on her face, to make her look more superficial and emphasize the fact she is a prostitute.


Annie had made the pregnant belly using a pillowcase filled with stuffing and on the day, when our actor tried it on, it was too big for her. So after many attempts, I managed to take out enough stuffing so it was fitted her but still look large as if she was quite heavily pregnant.
 
 Also, Hayley put the actor's hair in a messy bun which had loosened and strands were coming out.
 This is what our 2 actors looked like at the end of hair and make-up. Overall, the preparation went successfully as our actors looked how we wanted them to, especially the special fx make-up on the killer which looked good after Annie had tried out so many variations of it.


After, we made our way to the park and we took up a ladder so we could film the high angle shots, special fx make-up to the victim's arm wound which comes half way in the chase scene, the story board to direct the actors and the camera and tripod to film with. When we got up there, luckily we found a trolley so we used that to put our stuff in, including actors coats as it was very cold. The trolley was greatly beneficial to us as we kept moving around in the wooded area.


 I filmed the first shot, the establishing shot of the victim running away, using the tripod and this was hard because I had to partly hold the tripod as the ground was slightly unstable because it was extremely muddy. The week we filmed, it had been raining a lot, so when we were all moving around the park, it was very difficult. However, luckily the rest of our opening will be inside Hayley's shed. As well, the path the victim was running down was a popular path for people to walk down with their dogs so there was a lot of waiting for us so that in the shot there was no one else apart from the victim.


 When we began filming (around 2pm), it was relatively bright; bright enough so we did not need to use additional artificial lighting. In many of the first scenes we used natural lighting, however at around 4pm it got very dark so when we filmed the last few shots where the killer catches the victim, we used artificial lighting to illuminate the actor's faces for the camera.

We were not expecting the sky to get as dark as it did within half an hour so our last shots are quite dark. My group and I decided to incorporate this into the story - that the length of the chase had been going on for quite long, so when the killer finally caught her, it was late. This will make surprise the audience that the killer is that determined to get the victim, and will also emphasize the killer's agility juxtaposing the victim and how she tired after a while.


Before it got dark, we filmed the scene where the victim got cut by a branch and we used the ladder for this. The ladder was placed on muddy ground and I was on it so Hayley had to hold the ladder while I filmed. The ladder was against a tree and the branches were blocking the camera so I had to break off a few, but I kept some in the way to make the scene seem more realistic. Being on the ladder was not a problem as it was actually quite stable without Hayley supporting it.
Also, Annie and Hayley poured some fake blood on the branch and the leaves underneath and I filmed the killer approaching this. Meanwhile, Annie was applying the victim's wound from the branch so we saved time and when that was done, we filmed her being cut by the branch.


After we finished filming that, it began to get very dark, as mentioned, so when we found a thick enough tree for the victim to hide behind, we needed artificial lighting. Annie filmed the last few shots and Hayley and I held the lights. While Hayley and Annie were setting up, I directed the actors on what they had to do. All this saved time as we knew it was getting dark quickly. The lights were small which meant they did not project masses of light onto the actors which was good because when we watched over the recordings, the surroundings were dark and only the victims faces were illuminated, making the scene more scary and fitting with horror and slasher conventions of darkness to reflect the killer's inner darkness.


Once we had finished filming we looked over the scenes to see if we needed to re-do any however we felt they had turned out well. The filming process took around 2 hours, and our chase scene will be about 1 minute long. The only complications during filming was the muddy ground, we wanted our victim to be barefoot, then we decided she would wear heels but when we saw the ground, we decided she would wear trainers to make her seem less dignified and careless about her image. Also, the dog strollers were a minor issue which, again, we could not help so we had to work with.

Thursday, 12 December 2013

Practical Investigation of Production Company

 
In the opening for Blackout (2008), a woman has cut her wrist which we see through a close up. Then a straight cut is used to show us another close up, but of the blood dripping down the side of the white bath. A white bath is effective because the blood is made more prominent, however this would be more effective and gruesome if the audience were to see the blood dripping down the side of the bath.

This inspired us to create a production company animation where the person cuts their wrist and the blood drips down to form 'Kills Productions'. First, I applied liquid latex over my wrist so I can simply peel it off and all the make-up applied on top will come off.
Next, I applied scar wax and rolled it into long strips so when make-up and fake blood is put on it, the cut looks very deep. Then, I rubbed the outside edges to blend it in with my skin.
Then, I put black make-up in the 'cut' and in the corners where my skin met the scar wax so to create a shadow to make the cut look deeper. I applied a dark red colour on top of the black and on the scar wax around the cut to make it look bloody and wounded.

Next, I applied fake blood all over my wrist and in the cuts and let some drip down to make it look more gory and realistic. Then, I got some more fake blood and poured it down the side of a white sink, as seen in Blackout, and filmed it using a close up of my wrist then moved the camera downwards to show the blood drizzling down. This short clip will be added and edited to Annie's practical to make it look like this blood forms the words 'Kills Productions'.


Overall, I like our production company animation because it hints our slasher genre to the audience, unlike some slasher films that have production companies with misleading animations as investigated in my deconstruction post. As our opening will only be 2 minutes long, we want our audience to know they are watching a slasher film so this animation will establish that.

I began editing the clip and added sound. I chose a heavenly sound because it is parallel to this person who has bled to death. The sound is very ambiguous and denotes heaven, death, life, purity and is quite mysterious. I chose to include the sound from about 4 minutes in.


Here is the edited version with sound: