
Plan
Having deconstructed previous homemade production companies by fellow media students, I decided to create my own.My idea for our production company animation was to have the two words, "KILLS PRODUCTIONS", (our production company name), on a light coloured background with blood dripping down from the words. On the website "Myfonts" I looked at the different "blood" fonts to get inspiration on how the one I make will look like. Below shows the different fonts that I most liked:

This font is called Kerberos Fang. It makes the letters look like painted blood with a small amount of splattered blood around each letter.

Called DINfun Pro™ Halloween, this font simply takes simple straight, block font, adding drips of blood to each letter.

This font is called Nyctophobia. It produces the effect of blood splatter and dripping, making up each letter.

The font above is called Blood. Each letter is made up of the formation of dripping blood.
Having looked at these different types of fonts, I feel that by combining Kerberos Fang and DINfun Pro™ Halloween, I would get the font type that I want. This combines the ideas of the dripping blood and the small amount of blood splatter around each letter, making the effect look more realistic.
Not having used any type of animation technology before, I had to do some research into what to use to get the effect that I wished, how to then use it, and then how to create what I have planned.
In my research, I came across this short clip (shown above). Within it, the word "Blood" is dripping blood, making a pool of it under the word. As I saw it, I hoped I would be able to find out what program to do it on, and use this effect to make my production company clip. However, on looking into it further, I found you had to buy or download the software "blender"- both of which I was reluctant to do, unless I couldn't find a better alternative. Because of this, I carried on looking for different animation methods.
Finally, on YouTube, I found a tutorial of how to make the dripping blood text that I had imagined. It taught me how to make the image of blood dripping text from scratch, on Photoshop- a program that is available to me at school.
Going through all the steps, giving correct measurements and information on alternative methods to create this effect, this tutorial really helped me feel comfortable with making this image, assuring me that I would be able to produce, if not the same, a similar image to the one that they create.
The only problem that this Photoshop tutorial posed was that it was only created a single image, and not an animation of dripping blood from the text. To resolve this, I looked on YouTube again to see if I could take this image and put an animation onto it.
Eventually, I found the tutorial shown above, that showed me how to take an image made or placed in Photoshop, and manipulate it to create an animation timeline, that when played, created a short animation.
The skills I learnt from this tutorial, I felt that I could use to make the image that I would be able to create with the first tutorial, turn into an animation with blood dripping from the words "KILLS PRODUCTIONS".
Construction of Idea
Making the Initial Image

 To this new document, I used the text function to add the words "KILLS PRODUCTIONS" in a dark red colouring, making the font to be "Calibri".
Selecting the object that I just created- the text- I clicked on the "Align Horizontal Centers" icon at the top of the screen, making the text appear centered on the document.

The next step was to add simple straight lines from each of the letters that I had made. They all had to be coming from different places from each letter, and be a variety in thicknesses.
This step is shown to the left, and I applied it with the pencil tool.

To do this, I had to go to the "Filter" icon at the top of the screen, and select "Liquify".
Using the pucker tool, I made each line appear irregular, squeezing the lines- this would make it look more realistic.


I then used the bloat tool to enlarge the drips of blood at the bottom of the lines, making them look more like drips.
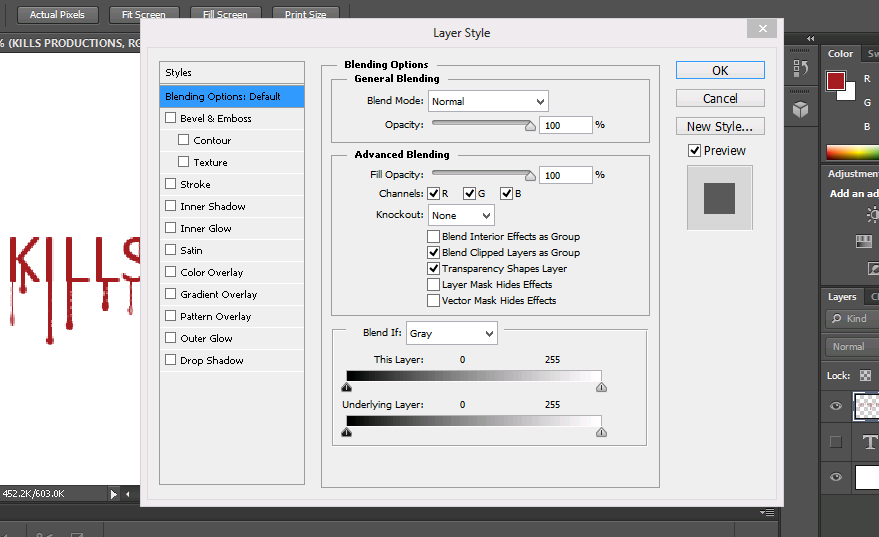
Here, I added a drop shadow, changing the distance, spread and size of it with the tools that it gave me.
I also added effect to the structure and shading of the text, adding depth to make it look more 3D.
To the gradient overlay, I made the blend mode to be soft light- softening the depth that I had added, keeping the "liquify" effect.
The final image that I was able to produce is the one shown below:

At this stage, I needed to take the image that I had just created and make an animation out of it.

 First, I opened the animation time line method that was available to me, and to this, I added the background layer, and the text layer that I already had. This, I found, produced the first slide within my timeline animation.
The next thing that I did was to duplicate the text layer that I had, naming it "2", and to this layer, and only this layer, I cut off the end "drip" of every drip of blood on every letter. I then went back to the "liquify" filter, using the bloating tool to add the drip back onto each line. Saving this as the second slide on the animation timeline, I repeated this action over and over until there were no more line "drips of blood" left.
 Playing the sequence that I had made through, it produced an animation, giving the effect that the blood was being sucked back into each letter- the opposite to what I wanted- so I reversed the slides, to make it look as if the drips were coming out of the words.
The small clip below shows what was produced at this point in time:
Deciding that this clip was too dark, not enabling the dripping blood effect to be seen as clearly, I added a lighter, cream background, changing the non diegetic sound to compare the differences between the two:
On comparison, even though it is darker, I feel that the black one is the best, based on the idea that it is the most effective with the sound to create tension, and that it links to the dark and scary theme of the slasher genre. If we highlighted the words and dripping blood more, perhaps it would resolve the issue with the poor visibility of the dripping of the blood.
No comments:
Post a Comment